Yamaha Helm Master EX autopilot integration
If Yamaha Helm Master EX is installed, its Track Point function can be activated with Q Display’s navigation function. Simply; push long for your chart to set a destination, create new or select an existing route from My routes to start navigation – your autopilot will start following the route until arriving to the destination or the navigation is stopped from the chart menu. Please note that for full Helm Master EX operation Yamaha CL5 touch panel needs to be installed.
New chart view mode setting: Perspective
In addition to north up and heading up modes you can now select perspective mode to view your chart in 3D. This allows you to view the chart much more to your driving direction. Zooming is currently disabled in this mode.
New dashboard application look
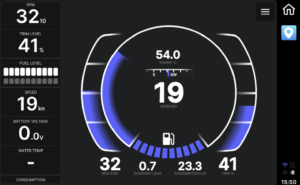
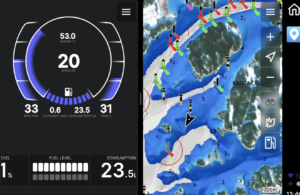
We designed a new dashboard look to show most relevant information in a single gauge. This gauge is hidden in very small layout sizes in your views. You can add smaller displays from the dashboard’s menu in the top of your view.

Chart radar overlay
If you have Raymarine Quantum radar installed, you can now enable a radar overlay in any of your chart views. You can control the radar’s function from the radar settings under your view’s chart settings.

Airmar IC-TM90M fishfinder support
We now support Airmar’s IC-TM90M fishfinder. When that is installed, the display will show Fishfinder application in the main menu.
Audio zone support
If you want to control your audio with different volumes in specific zones, you can enable audio zone control from Settings > Audio settings > Enable zone control. This shows two new settings to control the volume for separate zones – Zone 1 volume and Zone 2 volume. These allow you to specify the percentage from the master volume how loud the specific zone sounds.
New dashboard display: Speed conversion
This display allows you to view the speed in all three settings – Kilometers per hour, knots and Miles per hour. You can add this display to your Dashboard application from its application menu, or you can add it to your chart using Chart menu’s Dashboard widget.
New setting: Automatic time zone
When this is selected (on as a factory default), your time zone is defined automatically, thus setting your clock to the correct local time wherever you are. You can change this setting from Settings > System settings > Automatic time zone.
Language support for the software keyboard
You can now select a language from the supported languages for your keyboard. When the keyboard is showing, press the round icon in the left side of the space bar and select your preference.
Bugfixes
- Enabled Navionics Community Edits setting
- Fixed a problem with incorrect depth conversion
- Fixed problems with trip synchronization to Q Mobile app
Release notes in PDF form:
2119-342
Need help?
Do not hesitate to contact Q Support with any question about the use of your Q Display.
q-support@nextfour.com


